Showing posts with label crochet. Show all posts
Tuesday, July 30, 2013
Of butterflies and batwings
I found that "something else to crochet" I was looking for. A quick test pattern came up for a crocheted square, designed by Marie over at Underground Crafter. I took the call for testers because I was looking for a small project that wouldn't take much time while I was continuing with my other knitting work.
This square, as yet unnamed, showcases the bullion stitch, which I had never attempted before, as well as crossed double crochets, so it was an opportunity to teach this old dog some new tricks. Using some Cascade 220 remnants from previous projects, it worked up PDQ. I love the dark ombre color creating a frame for the bullions. Very pretty!
So, that was a nice little breather. Then on back to the shawl, which I finished yesterday.
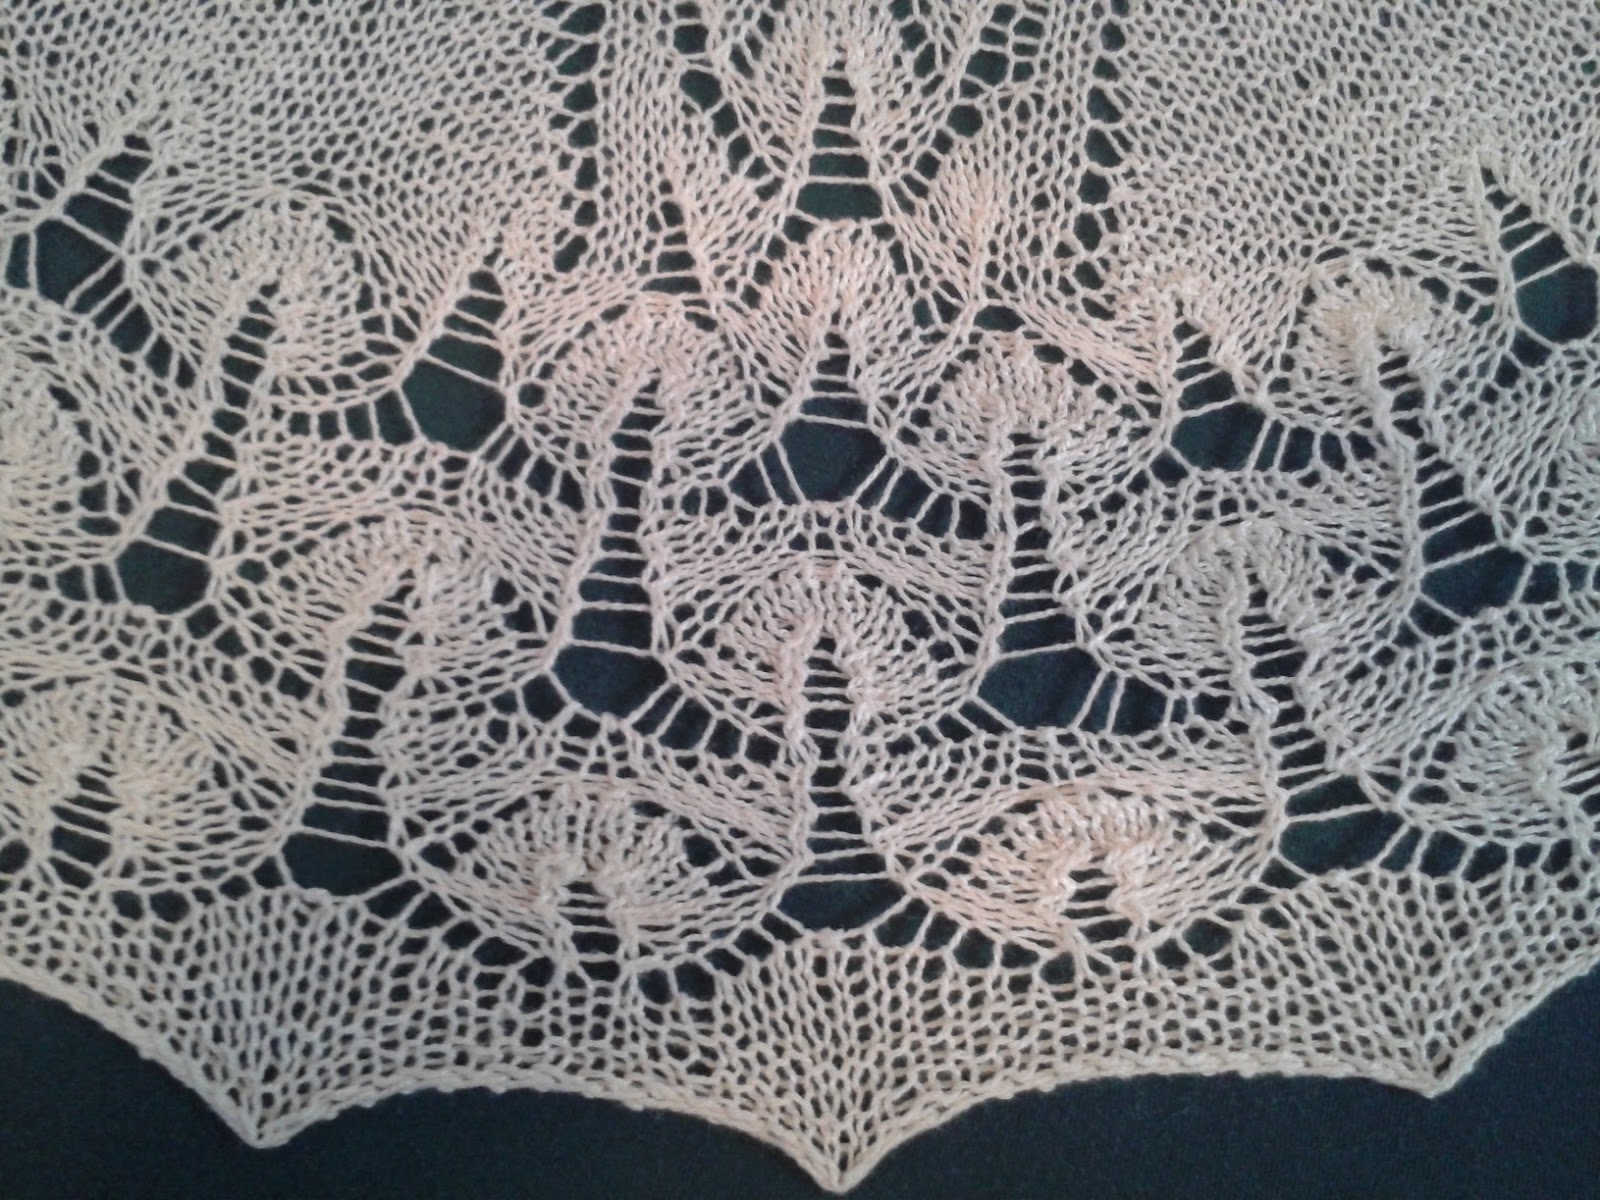
This gorgeous Faroese shawl, titled Thunder and Lightning, is the brainchild of a budding new designer named Tanja Lüscher. I was so impressed with the complexity of stitches Tanja used to create the beautiful and intricate lace design, and I learned a little something here too, about Faroese shawls.
Did you know there were Norwegian islands north of Great Britain called the Faroe Islands? I didn't! But I do now! It seems the traditional shawls created by the artisans on these islands are famous for their clever shaping. Instead of being triangles, they form bat or butterfly wings, designed to allow the ends of the shawl to hang forward securely over the shoulders without the aid of a pin. Brilliant!
With my recycled silk laceweight yarn in the pale icy yellow color, this shawl knitted up fairly quickly. I cast off and blocked it yesterday, and here is the result:
The center panel or gusset is one of the distinguishing features of Faroese shawls. The others are the short lines of yarnovers coming off either side of the gusset towards the top. That shoulder shaping is what makes this puppy different than a triangular shawl, directing the stitches at an almost 90 degree angle from the previous work and causing the ends to fall forward over the shoulders.
Here is a closer look at the lace detail at center back:
I will never cease to be dazzled and amazed by the cleverness of these designers who manage to create feats of engineering while producing such things of beauty. And I'm so privileged to be able to try my hand at their masterpieces.
Labels:
bullions,
crochet,
Faroese,
granny square,
knit,
knitting,
lace,
recycled,
shawl,
silk,
test
Sunday, June 9, 2013
Summer Has Begun
It's hard to believe almost a month has gone by since I last posted. Lots of busyness happening in our lives, though not much of it was fiber-related. However, I did get a chance to fit in a few new projects.
In early May, I discovered a wonderful thing. There are many creative folks out there designing knit and crochet projects that need folks like me who aren't so creative to test their designs and patterns for them. I am all on board with this, since I am an editor by nature and always find those little mistakes that can undo a beautiful project. I have often contacted designers and publishers to notify them of errors in the pattern, so I appreciate when a designer takes the time to have his/her pattern tested by others. I admire creative people, but they aren't often quite so picky about the little details as I am.
Anyway, my discovery and, subsequently, Project 11. On Ravelry, groups have begun popping up calling for pattern testers, and that got my attention. So I waited until I knew I'd have a little time to take on a small project and then found one that I thought I could tackle. The Surfer Boy Wallet by Michelle B. over at MyDailyFiber was a cute billfold-type item made with crochet cotton. I have TONS of this stuff, so I thought it would help with the destashing while giving me an opportunity to work with a designer. I checked out her other patterns and loved what I saw, so I raised my hand...and she picked me! Yay!
I used two different color threads: navy blue and a red/white/blue ombre.
Both of these threads are size 10, and the pattern called for a size 8 steel crochet hook. The project worked up very easily, and the small single crochets quickly created a stiff, dense fabric. I used the blue for the main color and the ombre for the card pocket.
Here's the finished product:
It holds bills and credit cards, but not coins, and can get wet with no issues. It's machine washable, and you just lay it open flat to dry. Thanks, Michelle, for giving me the chance! It was a pleasure to work with you!
After all that small crochet work, I was ready to knit again. I looked in my stash and found a large bag of red boucle called Marks & Kattens Freesia.
I think I found this yarn at Goodwill many moons ago, and just put it with the rest of the stash, waiting for the right project and then forgetting about it. It's a cotton/acrylic blend, and it's a true boucle, something you can't easily find anymore.
So I began my search (thank you, again, Ravelry) and even added the term "boucle" and, lo and behold, I found the perfect project. Janis Abel created a sweet little shawlette using a rayon boucle called the Ruffled Triangle Scarf. Although it was her first attempt a writing a pattern, she did a bang-up job of carefully explaining her short-row technique (which I love, by the way, as it requires no wraps). Because you use the short rows to create the ruffle, it takes longer than your average scarf or shawlette, but I love the results and am enjoying the process.
The combination of the boucle yarn and the short-row ruffles creates a gorgeous drape. I can't wait to finish this! And I believe I have enough yarn to make two!
And since I tend to have more than one project going, and since I found something groovy project that Leisure Arts posted on Facebook, and since my sister has now taken up crocheting and we like to do stuff together (is that enough excuse?), I started another project while the shawlette above is still in progress.
Project 13: Floppy Brimmed Hat. Two of my stash items, given to me several years back by my friend Keo (you've got to check out her amazing blog here), along with two ENORMOUS bags of yarn and crochet thread were two spools of J&P Coats Crochet Nylon. These are worsted-weight nylon cords that are strong and stiff, perfect for outdoor-type items. I had one new spool in beige,
and one in a very pale green that was started, but then rewound. Here's a photo of it after I finished the hat, though the green color is not quite true:
The hat called for 2 spools of cord, so I decided to use both of these and break up the colors. While very stiff, it crocheted with no problems, although weaving in is something of a challenge. Nevertheless, I got it finished just today, and present to you now my Summer Beach Hat, or what I like to call "How to Hide from the Sun and Everything Else"
Yes, I'm in there somewhere and, no, it doesn't matter which direction I'm facing, it would look like this. I take it the designer has a slightly larger head than I. Actually, I may pull out the last three rows on the brim and just leave a single row of the green for piping. Then I may be able to see out of it. :)
Labels:
boucle,
cotton,
crochet,
Freesia,
hat,
J&P Coats,
knit,
Marks & Kattens,
nylon cord,
scarf,
shawlette,
thread,
wallet
Thursday, May 9, 2013
Collar done - finally!
At long last, I finished the Irish Lace Collar.
It turned out larger than I thought it would be, but I really love it. This has been a true educational project for me in learning to interpret vaguely-written patterns and trying to understand the intention of the designer. It took me longer than I would have wished, but it was totally worth it.
Here's a closeup of one of the scalloped areas:
I blocked it last night and persuaded all those little triple picots to behave themselves and line up straight.
So, that's Project #3 finally done.
Last week, I also started and finished Project #10, my first chemo cap to donate to Crochet for Cancer. It allowed me to use up some of the ivory colored eyelash yarn, as well as take up some more of the ivory Silk-Bamboo. The original pattern is called Faux Fur by Nancy Brown and I found it in the book 100 Hats to Knit & Crochet. I like to call it my Phyllis Diller Hat:
Now, I'm off to have fun at The Knitting Closet! Be back later for more destashing projects.
Sunday, April 28, 2013
Working in White
Since learning about the Crochet for Cancer project, I'm looking at this challenge and my stash with new eyes, excited to have a worthy purpose for all that yarn instead of just trying to think of projects to get rid of it. A good deal of my yarn is soft and quite suitable, and so I will be knitting hats for some time, I think. :)
In the meantime, I made up a baby cap which I have labeled Project 9: The Little Boy Blue Ribbed Baby Hat, a sweet little pattern by Tonya Wagner over at The Shiznit site. Of course, she did her hat in blue - thus the title - while mine is white, as I am attempting to whittle away at that Cottontots yarn that just never seems to get used up!
I did this cap up for a newborn, and it is so soft! The darning needle beside it is there for size perspective and, as you can see, this is quite a tiny little fellow. I will probably use up the rest of the yellow and white Cottontots by making up as many of these as I can, and then will donate them to Pregnancy Resources, a wonderful organization here in Brevard County for pregnant women in crisis.
And an update on the Irish Lace Collar, the project that seems like it will never be done! After more stitching and ripping, I'm slowly making headway. As the directions suggested, I gave the collar a light pressing to help organize the placement of all those little triple picots and to help them lie flat so I could do the final rows.
This really is a lovely pattern, although it's more like a faux-Irish Lace. A true Irish Lace, I believe, is all about the motifs, which are quite dense and detailed, and then joined in an amazingly creative way on the lace ground. The "crown" design in this piece gives a nod to those detailed motifs, and the triple picots imitate the look of the lace ground.
Remember the trouble I was having with those picots? Well, the whole idea of a right and wrong side and working into the back of those little buggers creates the illusion of the picots being somehow suspended above the lace chains behind them. Very interesting!
It's not a difficult project at all, but between all the other projects I've been juggling and my difficulty in grasping the idea behind how this collar is constructed, this baby has dragged out way too long. I've enjoyed the challenge, but I will be happy when it's done. And I think all of Ireland should be grateful that they didn't have to depend on me to see them through the potato famine. At the rate I'm working, they would have starved. Erin go Braugh!
Saturday, April 13, 2013
Baby, baby, baby, oh!
Okay, I'll admit that those three words are the only thing I know about Justin Bieber, but they seemed appropriate today because of all the BABY stuff I've been doing!
First up, Project 1, the Zig Zag Baby Blanket blocked beautifully.
I couldn't be happier with how it turned out. And it looks so pretty with Project 6, the Ripple Eyelet Baby Hat, that I've decided they're going to be a gift for a little girl named Jessica Jade who is due in a couple of weeks.
This hat is really more for an older infant, though, and I wanted to have a newborn hat for her, as well. I found this gorgeous pattern called the Ava Lynne Baby Hat, and couldn't wait to try it. The designer's name is Jenny Sorensen, and I am so impressed with the beauty of this pattern. It worked up fairly quickly with some of my leftover white Bernat Cottontots and is sooooooo soft!
In keeping with the yellow-white color scheme, I wanted to add a little flower applique and found a Tropical Flower pattern by Jessica Zeltner on her blog, Living the Craft Life. This sweet little flower worked up in minutes, using a small amount of my pale yellow Size 10 crochet thread.
Isn't that pretty? And it looks so cute on the hat.
So there's Project 7. I'm so excited to give these items to my sweet young friend awaiting her baby girl. If I have enough of the yellow and white Cottontots yarn left, I may attempt a beautiful little sweater designed by Jeannie Leech to match the Ripple Eyelet hat. That would made a perfect set.
First up, Project 1, the Zig Zag Baby Blanket blocked beautifully.
I couldn't be happier with how it turned out. And it looks so pretty with Project 6, the Ripple Eyelet Baby Hat, that I've decided they're going to be a gift for a little girl named Jessica Jade who is due in a couple of weeks.
This hat is really more for an older infant, though, and I wanted to have a newborn hat for her, as well. I found this gorgeous pattern called the Ava Lynne Baby Hat, and couldn't wait to try it. The designer's name is Jenny Sorensen, and I am so impressed with the beauty of this pattern. It worked up fairly quickly with some of my leftover white Bernat Cottontots and is sooooooo soft!
In keeping with the yellow-white color scheme, I wanted to add a little flower applique and found a Tropical Flower pattern by Jessica Zeltner on her blog, Living the Craft Life. This sweet little flower worked up in minutes, using a small amount of my pale yellow Size 10 crochet thread.
Isn't that pretty? And it looks so cute on the hat.
Wednesday, April 10, 2013
Quick Fill-In Projects
I took a little time out from Projects 1 & 3 to whip up a little gift for a dear lady who blessed me this week. I wanted to make something lovely but not too personal. When she saw me crocheting the Irish Lace Collar, she made some very kind comments and bemoaned the "lost art." Perfect. I decided it would be some crocheted lace and searched through some patterns online and in my library. Then I remembered the delicate Undercover Bookmarker I had done several years ago as thank-you gifts for some of my children's homeschool co-op instructors.
It's a quick project, which I finished in about an hour and a half. A gentle touch with a steamy iron is all that's needed to set it straight, unless you want to pin open all those little loops to block it properly. Not surprisingly, I took the shortcut.
Kathryn A. White is the designer of this little gem, and let me tell you, this lady is a creative genius with crocheted lace. I can't wait to try more of her patterns, especially because I have SO MUCH COTTON THREAD!!!
I really do.
I've finished the Zig Zag Baby Blanket, and it's being blocked as I type. Unfortunately, it didn't use up all the yarn as I'd hoped it would. In looking for other baby items I could make to get through the remainder of the Bernat Cottontots, I found a very sweet pattern on Ravelry called the Ripple Eyelet Baby Hat, designed by Bonnie Brann. It's a knitted hat that has a similar pattern to the blanket! How cool is that?
The pattern is written as a flat piece to be seamed up at the end, but I hate seaming and so decided to work it in the round using circular needles and the magic loop method. I love using magic loop, particularly for pieces that will decrease in diameter, as it overrides the need for using double-pointed needles. You just keep working, using the same long cable, and voila!
I knitted most of it during my son's District track meet yesterday, and finished it up when I got home. We don't have any more babies in my home, nor any large dolls, so blocking is always tricky when I've made a baby hat. My solution? A large vase turned upside down covered with a clean towel and some plastic bags stuffed into the crown. Hehe. Looks silly, but I think it's working:
Time to tally up: Projects 1 and 2 are now complete. I'm still laboring over Project 3 - crocheting, ripping, crocheting, ripping, ad infinitum. I will count the Victorian Egg Covers as Project 4, the Undercover Bookmarker as Project 5 and the Ripple Eyelet Baby Hat as Project 6, since they all helped reduce my stash, however little.
What's next? The Asymmetrical Top didn't work out as planned. The 100% silk I harvested from the unraveled J.Jill sweater is just not soft enough (versus Paton's Silk & Bamboo, which my sister is using). So I think I'll save that yarn and attempt some lace shawls. I'm not sure there is any yarn in my stash suitable for the Top, however. That idea may have to simmer on the back burner a while.
Today will be a search-the-stash-and-plan-more-projects kind of day. Can't wait!
Wednesday, April 3, 2013
Finishing up Projects 1 & 2; Progress on 3
The first two projects of this challenge are nearly finished. Doing a happy dance!
I've been steadily plugging along with the Zig Zag Baby Blanket. This has become the project I take to my son's track meets with me. It tends to be cold up in those stands, and I'm sometimes there for 3 or more hours. This blanket gives me something simple to do with my hands while I'm watching the runners and keeps me warm at the same time!
When finished, this will be a good size for a stroller blanket. However, I'll still have one whole skein left each of yellow and white, so I'll have to come up with at least one more project for this yarn. I'm thinking about a bunch of baby hats.
On to Project #2: the Cozy Striped Kerchief. I have finished the entire body of this pretty shawlette, but the edges are bothering me, so I'm considering what type of border I can do along the striped edges to finish it nicely. I welcome any and all suggestions! I have plenty of the brown silk/cotton yarn, so that might be an option - maybe a crocheted edge? Hmmm
I am really pleased with how this kerchief has turned out. So glad I ripped out the first try!
Now that these two projects are nearly done, I've already begun looking at what to do next. My sister and I have purchased the pattern for a beautiful crocheted shell, offered by a talented lady who goes by the name Gu'Chet. The pattern recommends using Paton's Silk & Bamboo (the yarn I used in my kerchief!), but I have to follow my own rules! I remembered that I have some lovely 100% silk sock-weight yarn in my stash that I harvested from two J. Jill sweaters I unraveled. Here are the bubble-gum pink and ice yellow yarns I have to work with:
I haven't measured anything out yet, but I think there will be enough of either color for the shell. I'm currently testing with a gauge swatch, holding 2 strands together to try to get the DK weight necessary for the pattern, and then I'll do some measurements afterwards.
Quick update on Project #3: Irish Lace Collar. This was on hold for a little while, but I've started back to it again. Thanks to my brilliant cousin Jody at www.chickswithsticksofglenmontny.blogspot.com/, I got through those pesky triple picots and am on to new stitches. Who knew the thing had a front and a back? I do, now. And I'm very pleased with the progress thus far:
That's all for today.
I've been steadily plugging along with the Zig Zag Baby Blanket. This has become the project I take to my son's track meets with me. It tends to be cold up in those stands, and I'm sometimes there for 3 or more hours. This blanket gives me something simple to do with my hands while I'm watching the runners and keeps me warm at the same time!
When finished, this will be a good size for a stroller blanket. However, I'll still have one whole skein left each of yellow and white, so I'll have to come up with at least one more project for this yarn. I'm thinking about a bunch of baby hats.
On to Project #2: the Cozy Striped Kerchief. I have finished the entire body of this pretty shawlette, but the edges are bothering me, so I'm considering what type of border I can do along the striped edges to finish it nicely. I welcome any and all suggestions! I have plenty of the brown silk/cotton yarn, so that might be an option - maybe a crocheted edge? Hmmm
It doesn't show clearly in the photo above, but the stripes are so pretty against each other. Here's a closer look:I am really pleased with how this kerchief has turned out. So glad I ripped out the first try!
Now that these two projects are nearly done, I've already begun looking at what to do next. My sister and I have purchased the pattern for a beautiful crocheted shell, offered by a talented lady who goes by the name Gu'Chet. The pattern recommends using Paton's Silk & Bamboo (the yarn I used in my kerchief!), but I have to follow my own rules! I remembered that I have some lovely 100% silk sock-weight yarn in my stash that I harvested from two J. Jill sweaters I unraveled. Here are the bubble-gum pink and ice yellow yarns I have to work with:
I haven't measured anything out yet, but I think there will be enough of either color for the shell. I'm currently testing with a gauge swatch, holding 2 strands together to try to get the DK weight necessary for the pattern, and then I'll do some measurements afterwards.
Quick update on Project #3: Irish Lace Collar. This was on hold for a little while, but I've started back to it again. Thanks to my brilliant cousin Jody at www.chickswithsticksofglenmontny.blogspot.com/, I got through those pesky triple picots and am on to new stitches. Who knew the thing had a front and a back? I do, now. And I'm very pleased with the progress thus far:
That's all for today.
Labels:
baby,
blanket,
CityLife,
collar,
Cottontots,
crochet,
kerchief,
knitting,
lace,
recycled,
silk,
Silk-Bamboo,
thread
Tuesday, March 12, 2013
Two Steps Forward, One Back
Ribbit, ribbit. Do I hear frogs in the backyard? No, it's the sound of me ripping out the entire Cozy Striped Kerchief that I had just finished.
I know it sounds crazy, but it just didn't look right to me. And if I'm going to do this challenge, I want to be satisfied with the results and not just waste my stash making dumpy things.
Though it drives my husband bats when I number things, here are my three reasons for frogging:
#1. It was making me crazy that I didn't have the brown contrast stripe on every garter stitch ridge. Sometimes, almost good enough isn't good enough.
#2. The brown silk/cotton yarn, looked great, but I miscalculated the thickness. The 8-ply that I created was a DK weight, when what it wanted was a worsted weight to match the bands between the ridges. So, out comes the drop spindle again.
and the clincher,
#3. The finished kerchief was too small. I had to end it sonner than I should have because I ran out of the ladder yarn. However, I have plenty of the silk/bamboo and plenty of the brown silk/cotton, so.........
Ribbit, ribbit.
Everything's back in the bag, and I'm going to start again. The solutions to the above problems, as I see them (sorry, Bob):
1. Every garter ridge will be brown, but first....
2. I will re-spin the brown yarn into a 10-ply worsted weight and try again.
3. To help extend the ladder yarn, I'll take my daughter's advice to alternate the 6-row bands between the garter ridges: one with the silk/bamboo-ladder combination, and one with just the silk-bamboo. That way, I can make the pattern the correct size and be happy. :)
In the meantime, I'm continuing with the Zig Zag Baby Blanket. No new photos, since it looks the same as before, only longer. It's nice, sometimes, to have a simple pattern for a reliable outcome.
I'm also slowly getting on with the Irish Lace collar. After figuring out my dilemma (see last 2 posts), I've worked another row and a bit more of the next. Here's how it's looking so far:
And last night, I got to use a little of my scratchy Icelandic wool and the remnant of some brown Fun Fur to make an ancient Mongolian hat for my son's presentation on Genghis Khan to his homeschool co-op class today. It took 4 tries, but I finally got it to look the way I wanted:
I know it sounds crazy, but it just didn't look right to me. And if I'm going to do this challenge, I want to be satisfied with the results and not just waste my stash making dumpy things.
Though it drives my husband bats when I number things, here are my three reasons for frogging:
#1. It was making me crazy that I didn't have the brown contrast stripe on every garter stitch ridge. Sometimes, almost good enough isn't good enough.
#2. The brown silk/cotton yarn, looked great, but I miscalculated the thickness. The 8-ply that I created was a DK weight, when what it wanted was a worsted weight to match the bands between the ridges. So, out comes the drop spindle again.
and the clincher,
#3. The finished kerchief was too small. I had to end it sonner than I should have because I ran out of the ladder yarn. However, I have plenty of the silk/bamboo and plenty of the brown silk/cotton, so.........
Ribbit, ribbit.
Everything's back in the bag, and I'm going to start again. The solutions to the above problems, as I see them (sorry, Bob):
1. Every garter ridge will be brown, but first....
2. I will re-spin the brown yarn into a 10-ply worsted weight and try again.
3. To help extend the ladder yarn, I'll take my daughter's advice to alternate the 6-row bands between the garter ridges: one with the silk/bamboo-ladder combination, and one with just the silk-bamboo. That way, I can make the pattern the correct size and be happy. :)
*****
In the meantime, I'm continuing with the Zig Zag Baby Blanket. No new photos, since it looks the same as before, only longer. It's nice, sometimes, to have a simple pattern for a reliable outcome.
I'm also slowly getting on with the Irish Lace collar. After figuring out my dilemma (see last 2 posts), I've worked another row and a bit more of the next. Here's how it's looking so far:
And last night, I got to use a little of my scratchy Icelandic wool and the remnant of some brown Fun Fur to make an ancient Mongolian hat for my son's presentation on Genghis Khan to his homeschool co-op class today. It took 4 tries, but I finally got it to look the way I wanted:
He did a great job on his report, by the way!
Labels:
CityLife,
collar,
crochet,
eyelash,
hat,
kerchief,
knitting,
lace,
recycled,
silk,
Silk-Bamboo,
thread
Wednesday, March 6, 2013
An epiphany!
<cue Lone Ranger music>
I no sooner post my troubles with my triples (hee hee) on this blog and on Ravelry, but then my cousin Jody rides in (well, calls on the phone) and saves the day! Hooray!
Sometimes I am so one-dimensional in my thinking I scare myself. I couldn't get past the "single crochet in the slip stitch in front center of triple picot." All I could think was that this would be working "on top" of the picots and would hide them.
Uh...duh. We can always flip the silly thing upside down, right? That way, the Row 4 stitches, instead of covering up the previous row, would appear to be coming out from under the previous row! Yay!
Thank you, thank you, thank you, Jody! You had just the answer I needed! I'll post again with photos when I get it done. xoxo
(BTW, Jody is an expert knitter and crocheter herself and has a great blog of her own: http://chickswithsticksofglenmontny.blogspot.com/2012/03/spring.html?spref=fb)
And thank you also to kaycrochet from Ravelry who echoed Jody's idea just moments after I got the phone call.
I appreciate you ladies so much!
Running into snags
I didn't do much knitting or crocheting this weekend, having the opportunity to spend precious girl time with my beautiful daughter Sarah. We got some work done at home in the morning, and then went thrift shopping with thrifty friends and found a few treasures, brought home dinner, and snuggled together to watch the first two episodes of the first season of Dr. Who. Hurray for girl time!
It was back to the hooks and needles yesterday. I'm almost finished with the Kerchief Scarf, and really liking the way the brown silk/cotton yarn looks in contrast with the main color:
The last ball of the brown ran out, however, so I had to stop and spin some more from the unraveled sweater.
In the meantime, I picked up the Irish Lace Collar and ran into a snag on the fourth row. It's an old pattern from an old magazine, and I haven't located a reference to it anywhere online yet. Here's what the mag photo looks like:
Isn't it beautiful? The work begins at the top near the neck, and the first two rows are very easy. The third row creates that first line of Vs that you see, with triple picots at the bottom point of each V. Here's what I've got so far:
Of course, it's not blocked yet, so the Vs aren't straight and the picots aren't flat. Here's a closer look at a couple of those Vs with the triple picots on the points:
The problem is at the fourth row. The pattern instructs me to single crochet in the slip stitch in front center of the first triple picot, and then create a second row of these Vs and triple picots the same way I made the first, except that instead of single crocheting into an sc from the row below (as in Row 3), I'm to sc into the slip stitch in front center of the triple picot from the previous row. That's where I'm stuck.
Normally when crocheting lace, each row is built on top of the previous by crocheting into a stitch or a space. I've never crocheted into the front center of anything, and I just can't figure out how to do it. I tried approaching each triple picot from the right or the left, but it causes that little three-lobed picot to "bend its head" to one side or another. When I tried to treat it like a "front post" stitch, it lays across the top of the picot, mostly hiding it. Could that be right?
Anyone out there have experience with a similar pattern? I'd love to hear your thoughts. I'll keep at it and see how I fare.
BTW, during my research I found that the issue of White Crochet Magazine whence I found this pattern was not the one-and-only issue, as previously thought. It seems it was published until at least 1994. My apologies.
Saturday, March 2, 2013
Time for some crocheting, too!
I was mentioning my challenge and this blog to a sweet friend this week. She has a terrific little e-Bay boutique called The Ivory Mannequin (http://stores.ebay.com/The-Ivory-Mannequin) where she sells beee-uuu-teee-ful vintage dresses and lingerie, as well as more modern, quality women's clothing. She has seen an exciting trend in lace trimmings such as collars, cuffs, and chokers, and she encouraged me to set my hand to it.
I haven't crocheted any lace in a long time, apart from snowflakes each Christmas, so I was enthusiastic to take her suggestion. That directed me to another corner of my bedroom (actually under the bed) where I have a bin full of cotton crochet thread in various weights. It also propelled me to dig out some old patterns, books, and magazines with crocheted lace patterns.
I found the 1990 Premier issue of a magazine called White Crochet - actually, it might be the only issue they ever published! Ravelry had no record of it, in any case. I wasn't crazy about most of its patterns even when I purchased it, but there was a lovely Irish Lace Collar that I'd always wanted to try, so I decided to give it a go. It called for a size 30 thread and, fortunately, I had one ball of that size in white:
This is a nice, fine crochet thread, though admittedly not the finest. However, the size 11 steel crochet hook it called for was small enough for a first try without making me cross-eyed. Time for Project #3! Yay! Here's my progress after working just a little while the first night:
I'm having fun, and of course it just gives me another thing to prevent boredom with my two knitting projects, which are still in progress. So, thank you, dear Laura, and all you Steampunkers, Victorianas, and other lace-loving vintage afficianados who keep styles fresh and beautiful!
Subscribe to:
Posts (Atom)
.jpg)